
As a creative individual who loves to recreate fantasy worlds, I’ve discovered that 3D printing feels like having my own personal manufacturing plant. This is a breakthrough for cosplay fans, particularly those who want to accurately reproduce the famous Mandalorian helmets. However, with so many 3D printers available, how do you pick the best one for your space-age arsenal?
Today, we’re going to take a closer look at two popular models that are often at the center of this debate: the Ender 3 and the Anycubic i3 Mega. Both have proven their worth in the cosplay community, but they each have their own unique features and appeal. Let’s delve deeper and compare these two competitors to see which one might be the best choice for your next project.
Key Takeaways
The Ender 3 is a cost-effective choice with a robust community following, making it a solid choice for those on a budget or those in need of a supportive community.
The Anycubic i3 Mega provides a more user-friendly experience with features that are designed to cater to those who may not be as technically savvy.
Both printers are compatible with a variety of filaments, which is crucial for creating Mandalorian helmets that are both durable and realistic.
Having a supportive community can be invaluable for troubleshooting and sharing modifications to enhance your 3D printing experience.
| Feature | Ender 3 | Anycubic i3 Mega | Anycubic Mega-S |
|---|---|---|---|
| Price | Affordable, starting at $190 | Pricier option, around $290 | More expensive, around $320 |
| Printing Technology | Fused Deposition Modeling (FDM) | Fused Deposition Modeling (FDM) | Fused Deposition Modeling (FDM) |
| Build Volume | 220 x 220 x 250 mm | 210 x 210 x 205 mm | 8.3 x 8.3 x 8.1 inches |
| Printing Speed | Moderate | Moderate | Moderate |
| Print Quality | Good | Good | Good |
| Materials | Supports various filaments | Supports various filaments | Supports various filaments |
| Ease of Use | Beginner-friendly | Beginner-friendly | Beginner-friendly |
| Upgradability | Can be upgraded with mods | Can be upgraded with mods | Can be upgraded with mods |
| Maintenance | Requires regular maintenance | Requires regular maintenance | Requires regular maintenance |
| Community Support | Strong community support and resources available | Strong community support and resources available | Strong community support and resources available |
| Assembly | Requires assembly | Mostly assembled out of the box | Mostly assembled out of the box |
| Connectivity | Tethered USB, SD card | Not specified | Not specified |
| Extruder Upgrade | Not specified | Not specified | More compatible with flexible filaments |
| Spool Holder and Sensor | Not specified | Not specified | Suspended spool holder, repositioned sensor |
The Importance of 3D Printers in Creating a Mandalorian Helmets
3D printing has transformed the world of cosplay, making it possible for fans to recreate intricate designs from their favorite universes. Mandalorian helmets, with their sleek lines and battle-damaged aesthetics, are particularly well-suited for 3D printing. However, not all printers are equally capable of producing these complex pieces. The printer you choose can make the difference between a helmet that looks like it came straight from the screen and one that ends up gathering dust in the back of your closet.
Ender 3: A Cost-Effective Introduction to 3D Printing
We’ll kick things off with the Ender 3. This is a printer that gives you a lot of value for your money. It’s cheap and dependable, and it’s usually the first printer that aspiring cosplayers go for. And there’s a solid reason for that – it has a generous build volume of 220 x 220 x 250 mm, which is more than enough for most parts of a Mandalorian helmet.
However, the Ender 3’s main selling point is its robust community. There are forums, social media groups, and a wealth of online resources dedicated to this printer. Whether you’re troubleshooting a difficult print or seeking upgrade advice, the community is there to support you.
Anycubic i3 Mega: Prioritizing User Experience and Quality
Next, let’s talk about the Anycubic i3 Mega. This printer stands out because of its emphasis on user experience. It’s a semi-assembled printer, which means you can start printing faster than you can say, ‘I have spoken.’ It has a touch screen for easy use and has been commended for its strong frame and dependable printing.
However, being user-friendly doesn’t mean sacrificing quality. The i3 Mega is a competitor with a decent build volume of 210 x 210 x 205 mm, and it’s known for producing prints with sharp details – a must for the detailed work on a Mandalorian helmet.
Choosing the Right Material: The Secret to a Long-Lasting Helmet
In cosplay, the helmet’s durability is crucial. It should be able to endure the hustle and bustle of a convention floor. Both the Ender 3 and the Anycubic i3 Mega are compatible with a variety of materials, including PLA, ABS, and others. This flexibility is crucial because each material has its own set of advantages, such as PLA’s lightness or ABS’s heat resistance.
When it comes to Mandalorian helmets, you may be inclined to use something like PETG, which is a good compromise between printability and durability. Fortunately, both of these printers are up to the task, allowing you to select the most suitable material for your project.
Community Support: Aiding Your 3D Printing Adventure
As the saying goes, ‘It takes a village to raise a child,’ and the same can be applied to becoming proficient in 3D printing. The assistance you get from other enthusiasts can be as valuable as the printer itself. Both the Ender 3 and Anycubic i3 Mega have robust communities that offer guidance, share modifications, and provide moral support when you’re on your tenth attempt at printing a visor.
Most significantly, this community support ensures that you’re never on your own. You have a vast amount of knowledge to lean on, which is particularly beneficial when you’re just getting started.
3D Printer Showdown: Ender 3 vs. Anycubic i3 Mega
So, you’re at a fork in the road, unsure of which way to go: the Ender 3 or the Anycubic i3 Mega. Let’s dissect the elements that might sway your choice.

Cost vs. Quality: Assessing Your Purchase
Let’s discuss the financial aspect. The Ender 3 is the more budget-friendly choice, usually starting at around $190. That’s quite a bargain for a printer that can produce high-quality cosplay props. The Anycubic i3 Mega, in contrast, is a bit more expensive, costing around $600. But before you let the price tag influence you, think about what you’re getting for your money – a printer that’s designed to provide a more seamless experience right out of the box.
Important Printer Specifications
As with any 3D printing project, the details are crucial. Both printers utilize Fused Deposition Modeling (FDM) technology, which is perfect for cosplay projects. They also both have a reasonable printing speed, so you won’t have to wait days for a single print.
The Ender 3 does have a slightly larger build volume, which can be a deciding factor when printing larger helmet pieces. However, the i3 Mega, despite its slightly smaller build volume, is still more than capable of printing most parts. Plus, it often compensates for its size with its print quality.
Getting Started and User Friendliness
For beginners in 3D printing, the initial set-up can be a bit overwhelming. The Ender 3 needs some assembly, which can either be a fun learning experience or a bit of a hassle, depending on how you look at it. On the other hand, the Anycubic i3 Mega is more of a plug-and-play device, which can save you a lot of time.
With the Ender 3, you’ll have to roll up your sleeves and do a bit of assembly yourself, but it’s a great opportunity to become intimately familiar with your machine.
The Anycubic i3 Mega arrives semi-assembled, which means you can get started with printing that much sooner.
Both printers are also very beginner-friendly, with robust communities that provide detailed guides and video tutorials to help you along the way.
Handling Mistakes and Problem-Solving
Let’s face it: no 3D printer is perfect, and you’re likely to run into an issue at some point. This is where problem-solving becomes important. The Ender 3, with its large community of users, has nearly every conceivable problem documented with an available solution online. On the other hand, the Anycubic i3 Mega’s touch screen provides error messages that are easy to understand and actionable, making it simpler to fix problems as they arise.
So, if you’re halfway through printing your Mandalorian helmet and your printer starts giving you trouble, rest assured that assistance is readily available for both models. The distinction comes down to your preferred method of obtaining help: via community forums or direct guidance from the printer.
Creating the Ideal Helmet
Picture this: You have just downloaded the ideal model for your Mandalorian helmet. It’s intricate, it’s precise, and it’s going to be the highlight of your cosplay. But before you press ‘print,’ there are steps to be taken to make sure it comes out perfectly. For a comprehensive guide on 3D-printed cosplay helmets, including size adjustments, support structures, finishing techniques, and troubleshooting, be sure to read our detailed article.
Initially, slicing your model is necessary – this is the step where your 3D design is converted into layers that the printer can interpret. This is where you’ll spend a considerable amount of time adjusting settings to achieve the ideal balance of speed and quality.
Getting Your Design Ready: Slicing Software and Settings
Both the Ender 3 and the Anycubic i3 Mega have their own recommended slicing software. You’ll use these programs to change settings like layer height and infill density. For a Mandalorian helmet, you want the right amount of detail to highlight those recognizable features but not so much that it takes weeks for your print to finish. To achieve the best results, you might want to explore the best 3D printing software for cosplay helmets, which can help optimize your settings for a perfect print.
Keep in mind the aim is to create a helmet that is both durable and light. You’ll probably play around with options such as support structures and print orientation to perfect it. And if you’re unsure, the community is a great resource – there are endless slicing profiles shared by other hobbyists that can provide a great basis.
Optimizing Your Print Bed Space
Both printers offer a print bed that can accommodate most parts of a Mandalorian helmet. However, there may be instances where you need to print the helmet in sections, particularly when you’re aiming for a life-sized replica. This is when you have to be smart about how you arrange your print jobs.
Dividing your model into separate parts is not just a great way to maximize your print bed usage, but it also reduces the necessity for support, which can save you both material and time spent on post-processing. It’s akin to a 3D jigsaw puzzle, and the feeling of accomplishment when you get it right is unbeatable.
Quality Printing: It’s All About Monitoring and Adjusting
Even though your 3D printer is doing the hard work, you still have a job to do. You need to keep an eye on the Ender 3 and the Anycubic i3 Mega, especially during the first few layers. These layers are the base of your print, and if they’re not just right, you’ll need to start from scratch.
While your helmet is being printed, keep an eye out for any warping or shifting. If you notice anything out of place, don’t hesitate to stop the print and recalibrate. Paying close attention to the process can greatly improve the quality of the finished product. For more detailed guidance, check out our cosplay helmet 3D printing failure prevention and troubleshooting guide.
Transforming Filament into a Mandalorian Helmet
Watching a spool of filament transform into a Mandalorian helmet is a journey. Layer by layer, your vision comes to life. But the journey doesn’t end when the printer signals completion. There’s still the critical post-processing phase to navigate.
Layer Upon Layer: The 3D Printing Process Explained
3D printing builds your helmet layer by layer, ideal for intricate Mandalorian armor. The print direction impacts sturdiness and appearance. Printing vertically offers a polished finish, while horizontal printing results in a more durable construction. Finding the right balance is key.
Finishing Techniques: Smoothing and Detailing
After printing, the final touches bring your helmet to life:
Sanding: Start with rough grit to remove blemishes, then use finer grit for a polished finish.
Filling: Apply filler primer to cover gaps or print lines, then sand again.
Detailing: Add extra details with modeling putty.
These steps enhance both the appearance and comfort of your helmet.
Painting and Assembly: The Magic Touch
Painting gives your helmet a worn, realistic look. Techniques like dry brushing and washes add depth. For assembly, use glue, welding, or screws to ensure your helmet is solid and wearable. Patience is key to creating something this cool.
Practical Application: Cosplayers Weigh in on Ender 3 and Anycubic i3 Mega
But what’s the real story? That’s the bottom line. The Ender 3 and Anycubic i3 Mega have both been put through the wringer by cosplayers at conventions, photoshoots, and beyond. Here’s what they had to say.
Surviving the Wear and Tear of Cosplay
A cosplayer recounted their experience with a helmet printed using the Ender 3:
“I’ve sported my Mandalorian helmet to three different conventions now, and it’s still in great shape. I even dropped it once, and it only got a small scratch. The Ender 3 has been a real winner for me.”
From the perspective of an Anycubic i3 Mega user:
“The attention to detail on my helmet is amazing. I keep getting asked if I purchased it, but no – it’s all thanks to the i3 Mega. And the touch screen made troubleshooting errors during printing a breeze.”
These anecdotes underline not just the printers’ abilities but also the significance of picking the correct materials and settings for your project. A helmet that can withstand the demands of cosplay events is a testament to both the printer and the cosplayer’s expertise.
Modding Mania: Perfecting your Cosplay with Customization
One of the best parts of 3D printing is the limitless customization. Both the Ender 3 and Anycubic i3 Mega are fully modifiable. This means you can fine-tune your printer for improved performance, print quality, and even aesthetics. Whether it’s swapping out the nozzle for more detail or adding LED lights for some extra pizzazz, the modding mania within the 3D printing community is a tribute to the adaptability of these machines.
Practical Application:
Cosplayers Weigh in on Ender 3 and Anycubic i3 Mega
To truly understand the capabilities of these 3D printers, it’s important to hear from those who have put them to the test in the real world of cosplay. We reached out to experienced cosplayers to get their firsthand accounts of using the Ender 3 and Anycubic i3 Mega for their Mandalorian helmet projects.
Surviving the Wear and Tear of Cosplay
A seasoned cosplayer, known online as “Mando_Maker,” shared their experience with the Ender 3:
“I’ve been using the Ender 3 to print my Mandalorian helmets for the past two years, and it’s been an absolute workhorse. I’ve taken my helmets to multiple conventions, and they’ve held up remarkably well. I even had one take a tumble off a table, and aside from a small scratch, it came out unscathed. The Ender 3’s sturdy construction and the community’s wealth of modification guides have been invaluable in creating durable, screen-accurate cosplay pieces.”
From the perspective of an Anycubic i3 Mega user, “Beskar_Artisan” had this to say:
“When I decided to take my Mandalorian cosplay to the next level, the Anycubic i3 Mega was the obvious choice. The level of detail I was able to achieve on my helmet is simply stunning. I’ve had people at conventions ask me where I purchased it, and they’re always amazed to learn that I printed it myself. The touch screen interface made troubleshooting any issues a breeze, and I never had to worry about my print quality suffering.”
These testimonials underscore not only the printers’ capabilities but also the importance of selecting the right materials and settings for your cosplay projects. A helmet that can withstand the rigors of convention floors and photoshoots is a testament to both the printer’s performance and the cosplayer’s expertise.
Final Thoughts: Which Printer is Best for Mandalorian Helmets?
When it comes to the Ender 3 and the Anycubic i3 Mega, both printers have their own strengths. The Ender 3 is the more affordable choice and has a slightly bigger build volume, which is important for helmet printing. It also has a large support community that can help you with any problems. Meanwhile, the Anycubic i3 Mega offers a more user-friendly experience with its semi-assembled setup and easy-to-use touch screen, making it a strong choice for those who prioritize ease of use.
Ender 3: The Go-To for Cost-Effectiveness and Customizability
The Ender 3 is a giant in the 3D printing world, especially among cosplay artists. Its cost-effectiveness makes it approachable, while its customizability lets users stretch the machine’s capabilities. It’s a printer that evolves with you as you perfect your art, and for many, it’s the only printer they’ll ever need for crafting incredible cosplay items like Mandalorian helmets.
“The Ender 3 is my go-to for all my cosplay prints. I’ve tricked it out so much that it feels like it’s an extension of me. It’s more than just a tool; it’s a part of my creative journey.” – Cosplay Enthusiast
This is the kind of customization that makes the Ender 3 a fan favorite. You’re not just purchasing a printer; you’re buying into a hobby with room for growth.
The Anycubic i3 Mega is a printer designed for those who are more interested in the final product than the process of getting there. It comes semi-assembled, allowing you to start printing sooner, and its user-friendly interface makes it a great choice for beginners. Its focus on precision and ease of use means you can get high-quality prints without having to tinker with the printer.
In the end, choosing between these two printers is a matter of personal taste and what you value most in your 3D printing journey.
Anycubic i3 Mega: Perfect for the Detail-Oriented Printer
The Anycubic i3 Mega arrives semi-assembled, which means you can get to printing faster.
The printer features a touchscreen interface that makes the printing process easier.
It is known for its high-quality prints, making it great for detailed projects.
If you want a printer that is easy to use and doesn’t skimp on detail, the Anycubic i3 Mega is a great option. Its user-friendly features make it especially appealing to those who are new to the hobby or who want to focus more on creating and less on maintaining their machine.
Expanding Your 3D Printing Arsenal
As you embark on your journey to create the perfect Mandalorian helmet, you may find yourself in need of additional resources to enhance your skills and workflow. Here are a few recommendations to consider:
3D Modeling Software:
Blender (Free, open-source)
Fusion 360 (Free for hobbyists)
SolidWorks (Professional-grade, paid)
Finishing Techniques:
“Achieving a Weathered Look on 3D Printed Cosplay Props” – Blog post
“5 Steps to Smooth and Paint 3D Printed Parts” – Video tutorial
“Cosplay Helmet Finishing Guide” – Comprehensive guide
Troubleshooting and Community Support:
r/3Dprinting subreddit
Ender 3 and Anycubic i3 Mega forums
3D Printing for Cosplay Facebook group
By exploring these additional resources, you’ll be able to refine your 3D printing skills, discover new techniques, and connect with a community of like-minded cosplay enthusiasts who can offer guidance and inspiration.
Commonly Asked Questions
Are the Ender 3 and Anycubic i3 Mega Capable of Printing Large Helmet Pieces?
Indeed, both the Ender 3 and Anycubic i3 Mega possess a build volume that can handle large helmet pieces. However, if you’re looking to print life-sized helmets, you might need to print in sections and put the pieces together after printing.
Are 3D Printed Helmets Durable?
Yes, 3D-printed helmets can be very durable, especially when printed with materials like ABS or PETG. The durability also depends on the print settings, such as infill percentage and wall thickness. Proper post-processing, like sanding and painting, can further strengthen the helmet.
What Kind of Upkeep Do These Printers Need?
Both printers need routine upkeep, like ensuring the print bed is clean, oiling the moving parts, and sometimes calibrating the bed. It’s also vital to periodically check for any loose screws or parts that are wearing out.
Does Printer Resolution and Speed Matter for Helmets?
Printer resolution is crucial for getting all the little details of a Mandalorian helmet just right. Both printers provide resolutions that are more than adequate for cosplay props. Speed is a trade-off with quality; the faster you print, the less detail you get, so it’s important to strike the right balance.
When it comes to creating Mandalorian cosplay helmets, the choice between the Ender 3 and the Anycubic i3 Mega 3D printers comes down to a variety of factors. Both have their strengths and weaknesses, but overall, the Ender 3 is known for its reliability and ease of use, making it a great choice for beginners. On the other hand, the Anycubic i3 Mega is praised for its larger build volume and robust construction. For detailed insights on how to get the best results for your cosplay helmet, consider exploring 3D-printed helmet assembly techniques.
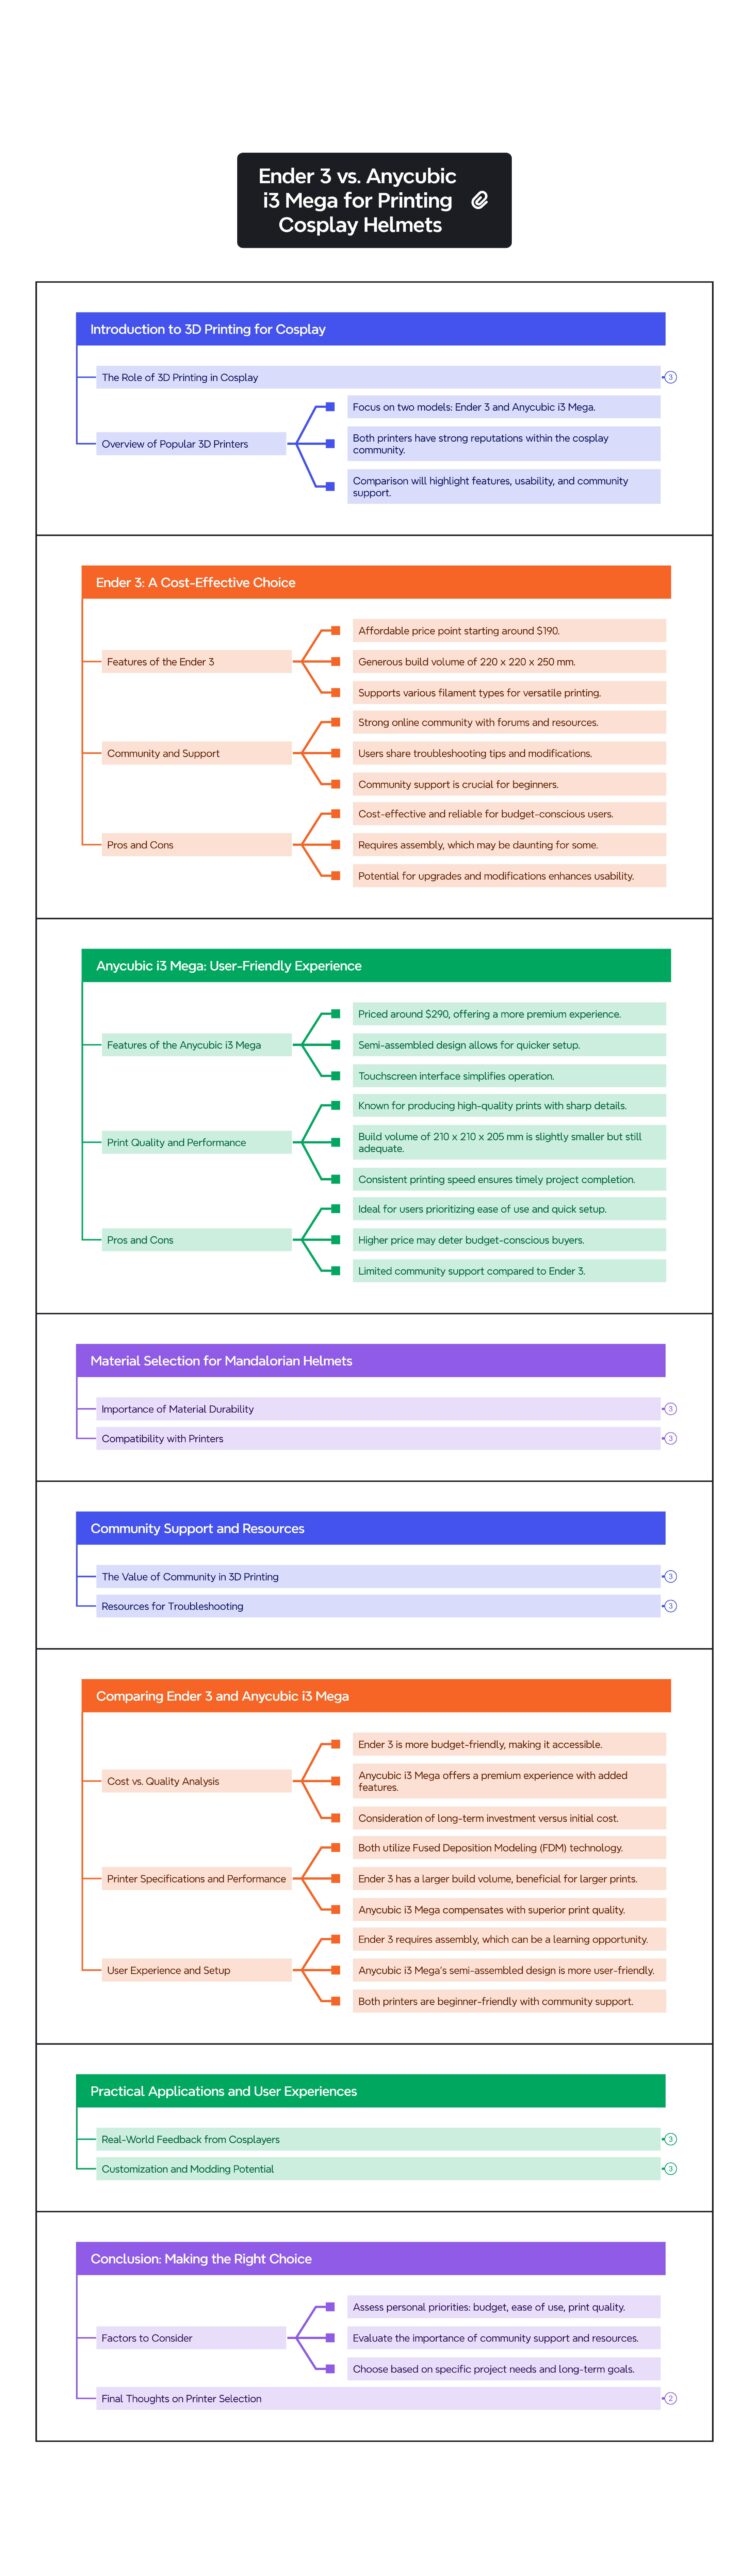
As we wrap up, the following grid provides a structured overview of the key concepts discussed in this post. Use it as a quick reference to reinforce your understanding and explore the connections between the main ideas:


Leave a Reply